In this article, you’ll learn how to configure Single Sign-On (SSO) for event registrants and Attendee Hub.
Service Provider-initiated SAML SSO for Event Registration and Attendee Hub
Service Provider (SP)-initiated Single Sign-On (SSO) starts in Cvent. Users navigates to Cvent, logs in to your identity provider, and then returns to Cvent.
Turning on SSO for event registration also enables SSO for Attendee Hub.
Configure SAML SSO
To configure, open a case and provide Cvent with the following from your identity provider:
- Issuer URI (entityID)
- Single Sign-On URL (location)
- Public x509 Certificate
Commonly, you’ll find this data in the metadata generated from your IdP.
Cvent will send you metadata in return, including a Organization ID used later in the setup.
Configure Your Identity Provider (IdP)
In your identity provider (IdP), configure the following:
- SAML version: Cvent supports SAML 1.1 or SAML 2.0.
- NameID: Set to email address. Cvent uses email as the default method of identifying users.
Configure Attributes
When logging users in, their Security Assertion Markup Language (SAML) assertion must contain the following required attributes. You can provide optional attributes to fill the user’s profile.
| Instruction | Field | Attribute Name |
|---|---|---|
| Required | First Name | first_name |
| Required | Last Name | last_name |
| Required | Email Address | email_address |
| Optional | Middle Name | middle_name |
| Optional | Prefix | prefix |
| Optional | Locale | locale |
| Optional | Title | title |
| Optional | Company | organization |
| Optional | Work Phone | work_phone |
| Optional | Mobile Phone | mobile_phone |
| Optional | Address 1 | address1 |
| Optional | City | city |
| Optional | State Code | state_code |
| Optional | Zip/Postal Code | postal_code |
| Optional | Country Code | country_code |
Optionally, Configure Custom Field Attributes (SP-initiated Only)
For each custom field you’d like to populate, send an attribute named exactly like the corresponding field in Cvent. The value for this attribute reflects the user’s specific value.
Turn On SP SSO in an Event and Attendee Hub
To turn on SP SSO in individual events and attendee hubs, do the following:
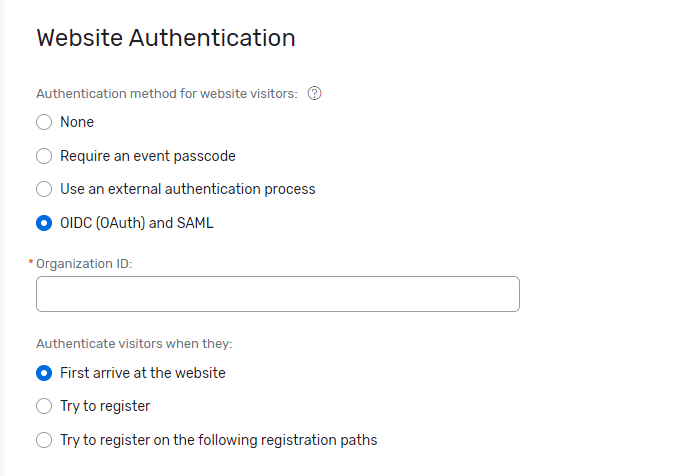
- Navigate to your event and select General and Event Settings.
- Find the Security tab.
- Under Website Authentication, select OIDC (OAuth) and SAML.
- Enter the Organization ID specified earlier during setup.
- Choose when you want visitors authenticated: upon arriving at the website, during registration, or on specific registration paths.
Test
Test the event by navigating to the event as a registrant. If you encounter any issues, contact support.
Identity Provider-initiated SAML SSO for Event Registration
Identity Provider (IdP)-initiated SSO uses a pseudo IdP-initiated process, where a user navigates to an event and authenticates in your identity provider through a direct login link. This SSO can only works with event registration.
Configure SAML SSO
To configure this single sign-on, open a case and provide Cvent with the following from your identity provider:
- Issuer URI (entityID)
- Single Sign-On URL (location)
- Public x509 Certificate
You can find these in the metadata generated from your IdP.
Configure Your Identity Provider (IdP)
In your identity provider (IdP), configure the following:
- SAML version: Cvent supports SAML 1.1 or SAML 2.0.
- NameID: Set to email address. Cvent uses email as the default method of identifying users.
Configure Attributes
When logging users in, their Security Assertion Markup Language (SAML) assertion must contain the following required attributes. Optional attributes can complete the user’s profile.
| Instruction | Field | Attribute Name | Maximum Length |
|---|---|---|---|
| Required | First Name | first_name | |
| Required | Last Name | last_name | |
| Required | Email Address | email_address | |
| Required (Set as null if not in use) | Source ID | source_id | |
| Optional | Contact Type Code | reg_code | 30 |
| Optional | Prefix | prefix | 30 |
| Optional | Designation | designation | 30 |
| Optional | Middle Name | middle_name | 30 |
| Optional | Nickname | nickname | 30 |
| Optional | Company | company | 100 |
| Optional | Title | title | 50 |
| Optional | Home Address 1 | home_address1 | 40 |
| Optional | Home Address 2 | home_address2 | 40 |
| Optional | Home Address 3 | home_address3 | 40 |
| Optional | Home City | home_city | 40 |
| Optional | Home State Code | home_state_code | unlimited |
| Optional | Home Postal Code | home_postal_code | 25 |
| Optional | Home Country Code | home_country | 3 |
| Optional | Home Phone | home_phone | 30 |
| Optional | Home Fax | home_fax | 30 |
| Optional | Work Address 1 | work_address1 | 40 |
| Optional | Work Address 2 | work_address2 | 40 |
| Optional | Work Address 3 | work_address3 | 40 |
| Optional | Work City | work_city | 40 |
| Optional | Work State Code | work_state_code | unlimited |
| Optional | Work Postal Code | work_postal_code | 25 |
| Optional | Work Country Code | work_country | 3 |
| Optional | Work Phone | work_phone | 30 |
| Optional | Work Fax | work_fax | 30 |
| Optional | Mobile Phone | mobile | 30 |
| Optional | Pager | pager | 30 |
| Optional | Reference ID | ref_id | 100 |
| Optional | Timestamp | timestamp | 10 |
| Optional | Signature | reg_signature | unlimited |
Optionally, Configure Custom Field Attributes (IdP-initiated Only)
For each profile custom field you’d like to populate, or internal event question, you must supply the following attribute information in pairs:
| Field | Field Name | Maximum Length | Details |
|---|---|---|---|
| User Custom Fields | field_stub1 | 36 | Unique UUID found by viewing the field in Cvent Admin or via the Cvent REST API. |
| User Custom Fields | field1 | 300 | Value you’d like to add to the field. |
| Internal Survey Question Fields | question_code1 | 30 | Unique code found in the event. |
| Internal Survey Question Fields | question_answer1 | - | Value you’d like to add to the field. |
Custom Field Example
You have a custom contact field in Cvent called Line of Business that needs populating via SSO.
Using the Cvent REST API,
you determine the Line of Business field in Cvent has the UUID abc12345-efg6-hij8-klm9-opqrstuvwxyz.
In your IdP, configure two attributes to send to Cvent:
field_stub1with the valueabc12345-efg6-hij8-klm9-opqrstuvwxyzfield1containing the user’s line of business, such asMarketing.
Turn On IdP SSO in an Event
To configure SSO for an event, you’ll need to retrieve the direct login link for the application you set up in your identity provider (IdP).
After that, do the following:
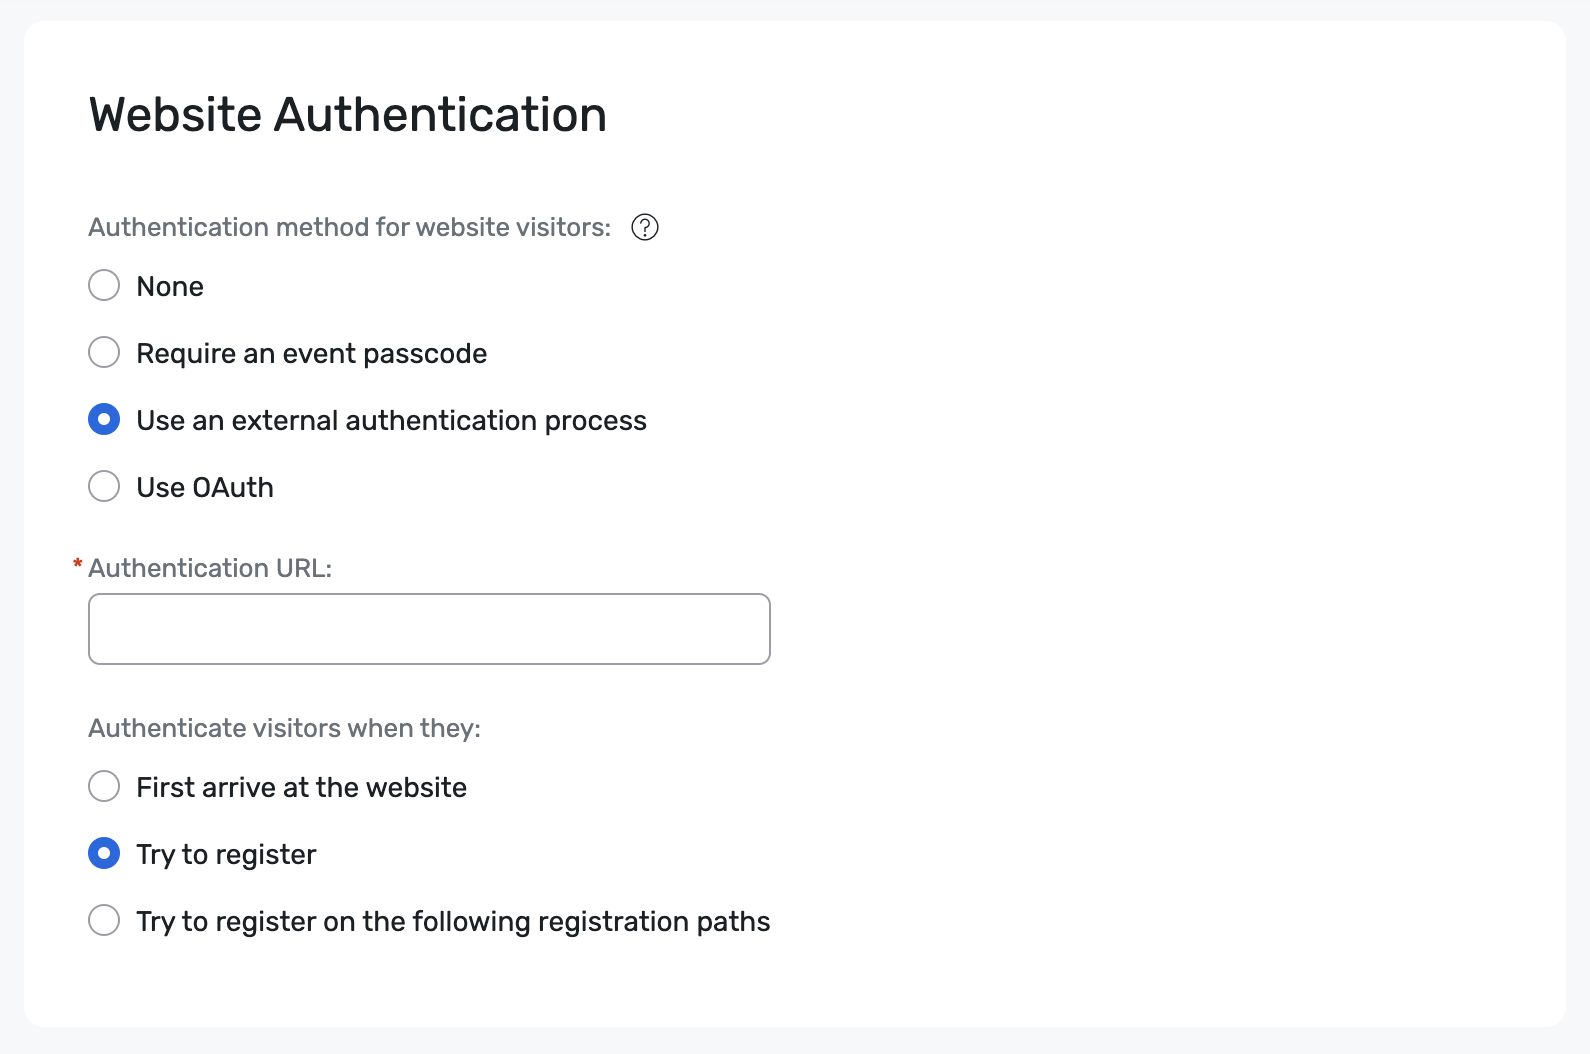
- Log in to Cvent and navigate to the event.
- Select General and Event Settings.
- In the top-navigation, select Security and click Edit.
- Under Website Authentication, select Use an external authentication process.
- In the Authentication URL field, add your direct login for the application you set up earlier in your IdP.
- Select when you’d like to authenticate visitors.
- Click Save.
When users navigate to the event website, their browser directs to the link you put in the Authentication URL field,
along with the query parameter ?target=[event-link] where [event-link] represents the event’s website URL. The intent
involves users authenticating with your IdP and then redirecting back to the event via the target query parameter.
‘Your IdP must accept query parameter RelayState’s for this process to work as described. Cvent can change the query parameter term target
to another value, if needed.
Test
Now test the event by navigating to Marketing and Weblinks and selecting one of the page URLs listed. If you encounter any issues, please report them.
Using SSO in Other Events
Your event planners can re-use a configured SSO integration for all their events. To do this, they’ll re-use the Authentication URL from your IdP that links directly to the login you used to test the first event.
Notes
- If your invitees determine their registration type by going through a custom process, make sure to select “Display personal information for invitees who arrive from a Cvent email” as Yes.
- If registration for your event remains private (for example, only open to those on an invitation list), select the option to only allow invitees to register via email invitations to ensure this setting also applies to registrants accessing your event via SSO.
OIDC (OAuth) SSO for Event Registrants and Attendee Hub
Cvent supports OpenID Connect (OIDC) for event registrants and Attendee Hub login. With OIDC, you can verify invitees before they register for an event and when they sign in to the Attendee Hub. This section explains how to enable OAuth for your event.
Configure Your Identity Provider
To configure this SSO, open a case and provide Cvent with the following information:
- Client ID
- Client Secret
- Issuer URL
- Scopes
- Well-Known Endpoint
Cvent uses the Well-Known Endpoint to retrieve the following details:
- JWKS Endpoint
- Authorization Endpoint
- Token Endpoint (must be public)
- User Info Endpoint (must be public and OIDC compliant)
Limitations
- Proof Key for Code Exchange (PKCE) isn’t supported and must be turned off.
- The Address Claim is always mapped to Home.
Configure Your Claims
When authorizing, you can supply claims to Cvent, which map onto the user’s profile. You must provide required claims. You can optionally include others to fill on the user’s profile. Name the attributes exactly as shown.
| Instruction | Cvent Field | OpenID Standard Claims | Notes |
|---|---|---|---|
| Required | First Name | given_name | |
| Required | Last Name | family_name | |
| Required | Email Address | ||
| Required | Source ID | sub | |
| Optional | Middle Name | middle_name | |
| Optional | Nickname | nickname | |
| Optional | Profile Image | picture | |
| Optional | Gender | gender | |
| Optional | Date of Birth | birthdate | |
| Optional | Phone Number | phone_number | Mapped to Home Address in Cvent by default. |
| Optional | Address 1 | address:street_address | Mapped to Home Address in Cvent by default. |
| Optional | City | address:locality | Mapped to Home Address in Cvent by default. |
Optionally, Configure Custom Field Attributes
For each profile custom field you would like to populate, send a claim named exactly like the corresponding field in Cvent. The value for this claim is the user’s value.
Enabling OAuth for an Event Website & Attendee Hub
To enable OAuth for your website, registration, and Attendee Hub:
- Navigate to your event and select General and Event Settings.
- Find the Security tab.
- Under Website Authentication, select OIDC (OAuth) and SAML. Enter the Organization ID specified during setup and choose when you want visitors to be authenticated: upon arriving at the website, during registration, or on specific registration paths.
- Click Save.
Test
Test your connection. If you encounter any issues, contact support.